Date: July 11, 2024

The CatVsNonCat image classifier uses a L-layer Neural network model to classify cat images.
I focused on creating Kubernetes cluster in Cloud environment and how to expose the application to outside world.

Github Repository : CatVsNonCat
Table of Content
- Motivation
- Why Kuberenetes?
- Skill Used
- Microservices
- Dockerize
- IaC
- ArgoCD
- TLS
- Kubernetes for MLOps
- Appendix
Motivation
My initial goal was to revisit the skills I've learned.
With recent interest on deep learning, I decided to create a Cat image classifying application on Kubernetes environment.
The prediction model uses the following steps to train a Neural Network:
- Forward Propagation
- \(a^{[l]} = ReLU(z^{[l]})\) for \(l=1,...L-1\)
- \(a^{[l]} = \sigma(z^{[l]})\) for \(l=L\)
- Compute cost
- Backward Propagation
- Gradient descent (Update parameters - \(\omega\), \(b\))
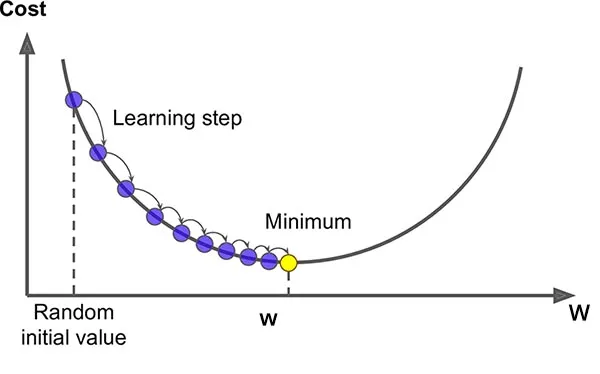
Original image credited to towardsdatascience.com
- jupyter notebook
def L_layer_model(
        parameters = init_params(layers_dims: List[int]),
        X: np.ndarray,
        Y: np.ndarray,
        layers_dims: List[int],
        learning_rate: float = 0.0075,
        num_iterations: int = 3000)
    # RETURNS Updated `parameters` and `costs`
    -> Tuple[dict, List[float]]:
Why Kubernetes?
- While docker and docker-compose
 can be used for deploying a web application, it falls short in terms of scalability, load balancing, IaC support (Terraform, Helm), and seamless cloud-native integration.
 - Kubernetes offers a rich set of APIs to address above challenges to manage Microservices.
- For local development, I chose
 to align with Kuberentes best practices. This
 consistencyensures a smoother transition to EKS production.
| docker-compose | Kubernetes | |
|---|---|---|
| Scalability | Limited to a Single host | Multi-node scaling |
| Load Balancing | Requires manual setup (e.g., HAProxy) | Support Load Balancing in various ways |
| IaC Support | Resticted to docker compose cli | Terraform, Helm for fast and reliable resource provisioning (< ~15 minutes) |

Scalability
Kubernetes offers orchestration of containerized applications across a cluster of nodes, ensuring scalability and high availability.

Horizontal Pod Autoscaling
HPA control loop checks CPU and Memory usage via api-server's metric api and scales accordingly.

- Pre-requisite to implement HPA:
- Install
metric-serveron the worker nodes (kube-system namespace) with helm!- → scrapes metrics from kublet
- → publish to
metrics.k8s.io/v1betaKuberentes API - → consumed by HPA!
- deployment.yaml:
spec.template.spec.containers[i].resourcesmust be specified. - deployment.yaml:
spec.replicasis to be omitted.
- Install
- hpa.yaml
spec.metrics[i].resourceto specify CPU and Memory thresholdspec.scaleTargetRef.nameto identify the target- in order to enable HPA to work on another metrics, you need to define addtional component.
apiVersion: autoscaling/v2
kind: HorizontalPodAutoscaler
metadata:
  name: fe-nginx-hpa
spec:
  scaleTargetRef:
    apiVersion: apps/v1
    kind: Deployment
    name: fe-nginx-deployment
  minReplicas: 1
  maxReplicas: 1
  metrics:
  - type: Resource
    resource:
      name: cpu
      target:
        type: Utilization
        averageUtilization: 80
  - type: Resource
    resource:
      name: memory
      target:
        type: Utilization
        averageUtilization: 70
- deployment.yaml
- Omit
spec.replica: xxin order to use HPA functionality.
- Omit
          resources:
            requests:
              cpu: 100m
              memory: 256Mi
            limits:
              cpu: 100m
              memory: 256Mi
Metric server

HPA monitoring

How does a HorizontalPodAutoscaler work?
- Algorithm details
desiredReplicas = ceil[currentReplicas * ( currentMetricValue / desiredMetricValue )]
Load Balancing
Kubernetes provides native support for load balancing and traffic routing through Ingress, Ingress Controller, and AWS Load Balancer Controller. I will be exploring two ways for exposing the Kuberentes application to the outside world:
Nginx Ingress Controller
Nginx Ingress Controller is a 3rd party implementation of Ingress controller.
- Install with Helm or kubectl. (in
ingressnamespace) - it provisions
NLBupon installation.- the Service of type LoadBalancer triggers the NLB creation during installation
- it monitors
Ingressresource:- for each Ingress being created, it is converted to Nignx native
Luaconfiguration and routes to the target service! The controller acts as a proxy and redirects traffic into services.
- for each Ingress being created, it is converted to Nignx native

- Monitoring tools like
Prometheuscan scrape metrics (traffic, latency, errors for all Ingresses) from the nginx ingress controller pod without implementing anything on the Application side! <!-- - must specify
ingressClassNameas the name of Ingress Nginx controller. (helm installing using Terraform, specify same name as this)- When you create an Ingress resource with the specified ingressClassName, the NGINX Ingress Controller reads the Ingress rules and updates its configuration accordingly. -->

Original image credited to kubernetes.io
kubectl get ingressclass -A
# NAME            CONTROLLER            PARAMETERS  AGE
# alb             ingress.k8s.aws/alb   <none>      20m
# external-nginx  k8s.io/ingress-nginx  <none>      20m
 |
|---|
- Baremetal (To-be-tested)
- Link
- A pure software solution: MetalLB
- Over a NodePort Service
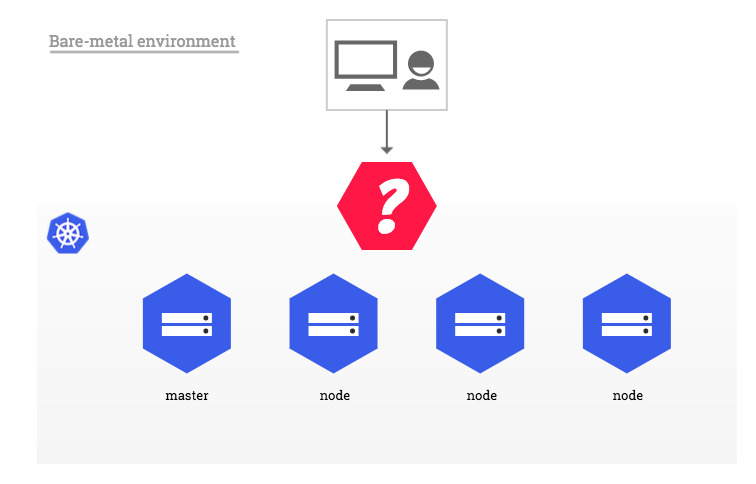
Original image credited to kubernetes.github.io
AWS Load Balancer Controller
- The controller (in
kube-systemnamespace) watches for Kubernetes Ingress or Service resources. In response, it creates the appropriate AWS Elastic Load Balancing resources.- The LBC provisions
ALBwhen you create an Ingress. - The LBC provisions
NLBwhen you create a Service of type LoadBalancer. - ALB is slower than NLB and more expensive.
- The LBC provisions
 |
|---|
| AWS Load Balancer Controller - L4 or L7 |
 |
|---|
| ALB with AWS Load Balancer Controller |
Skills used
Kubernetes- AWS: EKS cluster with 3 worker nodes. Terraform to deploy EKS and AWS Load Balancer Controller and Ingress for exposing the app.
- Local: 3-node cluster with microk8s.
Terraformiac to create:LINK- IAM Role and policy association with serviceaccount
- Networks, EKS cluster, node group, addons
Helm Chart- deploy application using templates
LINK
DockerandDockerfilefor building imagesGithub Actionsfor CI- Github repository -> Dockerhub image repository
Microservices Architecture- Frontend : Nginx (with html, css, js)
- Backend : Golang (go-gin), Python (uvicorn) as backend web server
Deep learningalgorithm for training and predicting Cat images usingnumpyandpytorch(in-progress)Virtualbox(with cli) to test configure 3 microk8s Kubernetes master nodes (ubuntu) in local environmentGolang Concurrency- used context, channel, goroutine for concurrent programming
Microservices
- Kubelet configures Pods' DNS so that running containers can lookup Services by name rather than IP.
 |
 |
|---|---|
| applications diagram |
Frontend - Nginx- Nginx serves as the static content server, handling HTML, CSS, and JavaScript files.
-
It ensures efficient delivery of frontend resources to users' browsers.
-
Backend - Go-Gin web-server - The Go-Gin server acts as an intermediary between the frontend and backend services.
- It receives requests from the frontend, including requests for cat-related information.
- Additionally, it performs utility functions, such as fetching weather data for three cities using goroutine concurrency (5-worker).
- main.go
-
- Implemented with
Fan-out/Fan-in pattern - Another possible pattern:
Worker-pool pattern
- Implemented with
-
Backend - Python uvicorn + fast api web-server- The Python backend worker is responsible for image classification.
- TODO (not complete):
- Given an image URL, it uses PyTorch (and possibly NumPy) to perform binary classification (cat vs. non-cat).
- The result of the classification is then relayed back to the Go-Gin server.
-
How it works?- When a user submits an image URL via the frontend(browser), the Go-Gin server receives the request.
- It forwards the request to the Python backend.
- The Python backend processes the image using the deep learning algorithm.
- Finally, the result (whether the image contains a cat or not) is sent back to the frontend.
-
Next Goal- Enhance the Python backend by incorporating a deep learning algorithm using pytorch.
- I initially did a Numpy implementation with 5-Layer and 2,500 iterations for training parameters.
- Now, I'm exploring the use of PyTorch for training the model and performing predictions
Frontend nginx
- Vanilla Javascript
- HTML/CSS - bootstrap
- Nginx server that serves static files: /usr/share/nginx/html
- Dockerized with
nginx:alpineImage
Backend Python web server
-
Use FastAPI + Unicorn
- FastAPI is an ASGI (Asynchronous Server Gateway Interface) framework which requires an ASGI server to run.
- Unicorn is a lightning-fast ASGI server implementation
-
install python (download .exe from python.org)
- check Add to PATH option (required)
-
Run the python web server
uvicorn main:app --port 3002
Dockerize
NOTE: It is crucial to optimize Docker images to be as compact as possible. To achieve this is by utilizing base images that are minimalistic, such as the Alpine image and using Multi-stage builds.
Multi-stage builds
- Reference LINK
# Use an golang alpine as the base image
FROM golang:1.22.3-alpine as build

# Set the temporary working directory in the container in the first stage
WORKDIR /

# # Copy package.json and package-lock.json into the working directory
COPY go.mod go.sum ./
COPY backend/web ./backend/web
COPY cmd/backend-web-server/main.go ./cmd/backend-web-server/main.go
COPY pkg ./pkg

# Copy the .env file into the working directory
COPY .env .env

# # Install the app dependencies inside the docker image
RUN go mod download && go mod verify

# Set GOARCH and GOOS for the build target
ENV CGO_ENABLED=0 GOOS=linux GOARCH=amd64

# # Define the command to run your app using CMD which defines your runtime
RUN go build -o backend-web-server ./cmd/backend-web-server

RUN rm -rf /var/cache/apk/* /tmp/*

# Use a smaller base image for the final image
FROM alpine:latest

# Copy the binary from the build stage
COPY --from=build /backend-web-server /usr/local/bin/backend-web-server

# Copy the .env file from the build stage
# put in root directory / becasuse running CMD "backend-web-server" is ru
COPY --from=build /.env /.env

EXPOSE 3001

# When you specify CMD ["go-app"], Docker looks for an executable named go-app in the system's $PATH.
# The $PATH includes common directories where executables are stored, such as /usr/local/bin, /usr/bin, and others.
CMD ["backend-web-server", "-web-host=:3001"]
minikube docker-env
- To point your shell to minikube's docker-daemon, run:
- Build docker images in local and minikube Pods can refer to it
eval $(minikube -p minikube docker-env)
- To Unset
# unset DOCKER_TLS_VERIFY
# unset DOCKER_HOST
# unset DOCKER_CERT_PATH
# unset MINIKUBE_ACTIVE_DOCKERD
eval $(minikube -p minikube docker-env --unset)
- Apply changes in local development
- Edit file
- build image -
./build-nginx.sh - restart pod -
./rstart-nginx.sh
IaC
Terraform
- VPC, Subnet, igw, nat, route table, etc.
- IAM role with assume-role-policy
- attach the required Amazon EKS IAM managed policy to it.
-
Attach AmazonEKSClusterPolicy policy to IAM role:
6-eks.tf -
Download terraform.exe
- Environment variable > Add Path: C:\Program Files\terraform_1.8.5_windows_amd64
# Navigate to your Terraform configuration directory
# cd path/to/your/terraform/configuration
cd terraform

# Initialize Terraform
terraform init

# Validate the configuration
terraform validate

# Format the Configuration
terraform fmt

# Plan the deployment
terraform plan

# Apply the configuration
terraform apply

# With DEBUGGING enabled
TF_LOG=DEBUG terraform apply

# Destroy
# terraform destroy
- Check ingressClass
kubectl get ingressclass -A
# NAME            CONTROLLER            PARAMETERS  AGE
# alb             ingress.k8s.aws/alb   <none>      20m
# external-nginx  k8s.io/ingress-nginx  <none>      20m
 |
|---|
| ingress resource |
 |
|---|
aws load-balancer controller pod in kube-system namespace |
git clone https://github.com/jnuho/terraform-aws-vpc.git
cd terraform-aws-vpc
git add .
git commit -m 'create vpc module'
git tag 0.1.0
git push origin main --tags
Helm Chart
-
Configure
kubectl- Check context :
kubectl config current-context - Update
.kube/config
- Check context :
# TO LOCAL
kubectl config use-context minikube

# TO EKS
aws eks update-kubeconfig --region ap-northeast-2 --name my-cluster --profile terraform
- Install
helmon the same client PC askubectl
curl -fsSL -o get_helm.sh https://raw.githubusercontent.com/helm/helm/main/scripts/get-helm-3
chmod 700 get_helm.sh
./get_helm.sh
- Create
# Create helm chart
helm create cat-chart
- Validate
cd CatVsNonCat/script
tree
    cat-chart
       ├── Chart.yaml
       ├── charts
       ├── templates
       │   ├── _helpers.tpl
       │   ├── deployment.yaml
       │   ├── hpa.yaml
       │   ├── ingress.yaml
       │   └── service.yaml
       ├── values.dev.yaml
       ├── values.prd.AWS.L4.lbc.yaml
       ├── values.prd.AWS.L7.lbc.yaml
       └── values.prd.AWS.L4.ingress.controller.yaml

helm lint cat-chart
helm template cat-chart --debug
# check results without installation
# helm install --dry-run cat-chart --generate-name
helm install --dry-run cat-release ./cat-chart -f ./cat-chart/values.pi.yaml
helm install --dry-run cat-release ./cat-chart -f ./cat-chart/values.prd.AWS.L4.ingress.controller.yaml
- Install
helm install cat-release ./cat-chart -f ./cat-chart/values.prd.AWS.L4.ingress.controller.yaml
- Upgrade
- Helm will perform a rolling update for the affected resources (e.g., Deployments, StatefulSets).
- Pods are replaced one by one, ensuring zero-downtime during the update.
- Helm manages this process transparently.
- Edit
values.dev.yamland applyhelm upgradecommand
kubectl patch deployment my-app --type='json' -p='[{"op":"replace","path":"/spec/replicas","value":5}]'

services:
  - name: fe-nginx
    replicaCount: 3
helm list
    NAME            NAMESPACE       REVISION        UPDATED                                 STATUS          CHART              APP VERSION
    cat-release     default         1               2024-07-09 14:25:50.410043621 +0900 KST deployed        cat-chart-0.1.0    1.16.0

helm upgrade cat-release ./cat-chart -f ./cat-chart/values.prd.AWS.L4.ingress.controller.yaml
    Release "cat-release" has been upgraded. Happy Helming!
    NAME: cat-release
    LAST DEPLOYED: Tue Jul  9 14:35:35 2024
    NAMESPACE: default
    STATUS: deployed
    REVISION: 2
    TEST SUITE: None

helm list
    NAME            NAMESPACE       REVISION        UPDATED                                 STATUS          CHART              APP VERSION
    cat-release     default         2               2024-07-09 14:35:35.404055879 +0900 KST deployed        cat-chart-0.1.0    1.16.0
- Rollback
helm rollback cat-release VERSION_NO
- Uninstall (Helm v3)
helm delete --purgein Helm V2
helm uninstall cat-release
- Helm Repository
- While you can deploy a Helm chart directly from the filesystem,
- it's recommended to use Helm repositories.
- Helm repositories allow versioning, collaboration, and easy distribution of charts
LINK
ArgoCD
helm repo add argo https://argoproj.github.io/argo-helm
helm repo update

helm search repo argocd
helm show values argo/argo-cd --version 3.35.4 > argocd-defaults.yaml
# Edit variables and apply
vim argocd-defaults.yaml
kubectl apply -f argocd-defaults.yaml
- You can use Terraform as well.
# Use Terraform for equivalent command as the following:
# helm install argocd -n argocd --create-namespace argo/argo-cd --version 3.35.4 -f terraform/values/argocd.yaml
terraform apply

helm status argocd -n argocd
# check for failing install
helm list  --pending -A

helm list -A
k get pod -n argocd
k get secrets -n argocd
k get secrets argocd-intitial-admin-secret -o yaml -n argocd
echo -n "PASSWORKDKDKD" | base64 -d

kubectl port-forward svc/argocd-server -n argocd 8080:80
    http://localhost:8080
    login with admin/password
- Create Git Repository for
yamlandhelmchart templates.
git clone new-repo
- Setup Dockerhub Account (and Create Repository only for private repo)
docker login --username jnuho
docker pull nginx:1.23.3

docker tag nginx:1.23.3 jnuho/nginx:v0.1.0
docker push jnuho/nginx:v0.1.0

# Write yaml/helm and push to repo
git add .
git commit -m 'add yaml/helm'
git push origin main
- Configure argocd to watch for Git Repo (yaml/helm)
- Create
ApplicationCRDs for ArgoCD
- Create
kubectl apply -f script/argocd/application.yaml
- Workflow
- docker tag
- docker push
- Edit deployment.yaml's image tag
- git push to
cvn-yamlGit Repo
- git push to
- Argocd detects in 5 minutes
- manually
Syncor - edit application.yaml to automatically
Sync
- manually
- Create
upgrade.sh- Run: ./upgrade.sh v0.1.3
TLS
Self-signed SSL/TLS Certificate vs. CA Certificate
The difference between a CA certificate and a self-signed certificate is the issuer of the certificate.
Kubernetes for MLOps
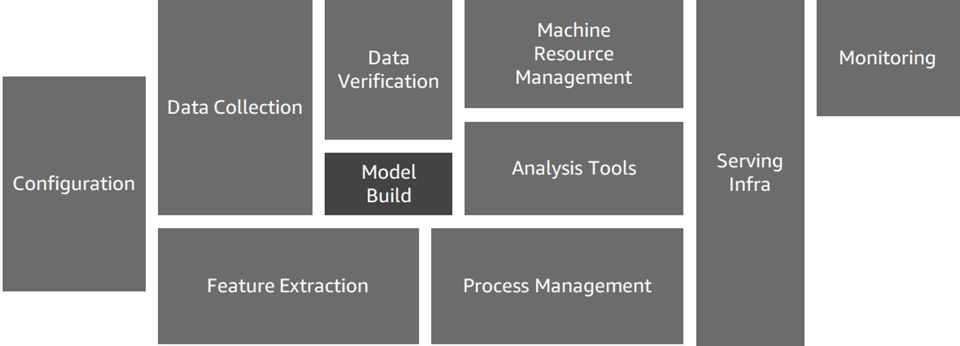
Original image credited to papers.nips.cc/paper/2015/file/86df7dcfd896fcaf2674f757a2463eba-Paper.pdf and coffeewhale.com
Original image credited to .determined.ai
- Challenges of Using Kubernetes-Based ML Tools
- Containerizing Code (Docker Image Build and Execution):
- Writing Kubernetes Manifests (YAML Files):
